Setup FlightPath Server
- 1 - Install FlightPath Server for MacOS or Windows
- 2 - Run the server
- 3 - Create your admin key
- 4 - Check server access from FlightPath Data
1 - Install FlightPath Server for MacOS or Windows
For a quick roll-out, FlightPath Server is bundled with the FlightPath Data frontend app. When you install FlightPath Data you are also installing FlightPath Server.


FlightPath Data is free and open. There is nothing to buy. GitHub is also an option, if you’re on Linux or other platforms. If you have special requirements, please contact support@flightpathdata.com.
2 - Run the server
To run FlightPath Server you start it from the command line. In a console, cd to the directory your FlightPath Data binary is installed in.
When FlightPath Server starts it prints summary Uvicorn HTTP server config information and the path to the FlightPath Server config file. FlightPath Server creates a folder for config and projects in your home directory. If you installed FlightPath Data from Microsoft or Apple’s stores, however, your FlightPath Server is running in a sandbox and the path to the server’s config file may not be as obvious as it otherwise would be.
When you have launched the server you should get a simple response back from:
curl http://localhost:8000
Mac
On macOS FlightPath Server runs from the same binary as FlightPath Data. On the command line you simply pass --server-mode or -s. You can, of course, run both FlightPath Server and FlightPath Data at the same time.
On a Mac the path to the binary is typically: /Applications/FlightPath\ Data.app/Contents/MacOS/FlightPath\ Data. (Notice that in Finder /Applications/FlightPath\ Data.app looks like a file, but is in reality a directory structure, as is true for all macOS apps).
Passing the --server-mode flag (or -s for short) spins up FlightPath Server, rather than starting the FlightPath Data app.

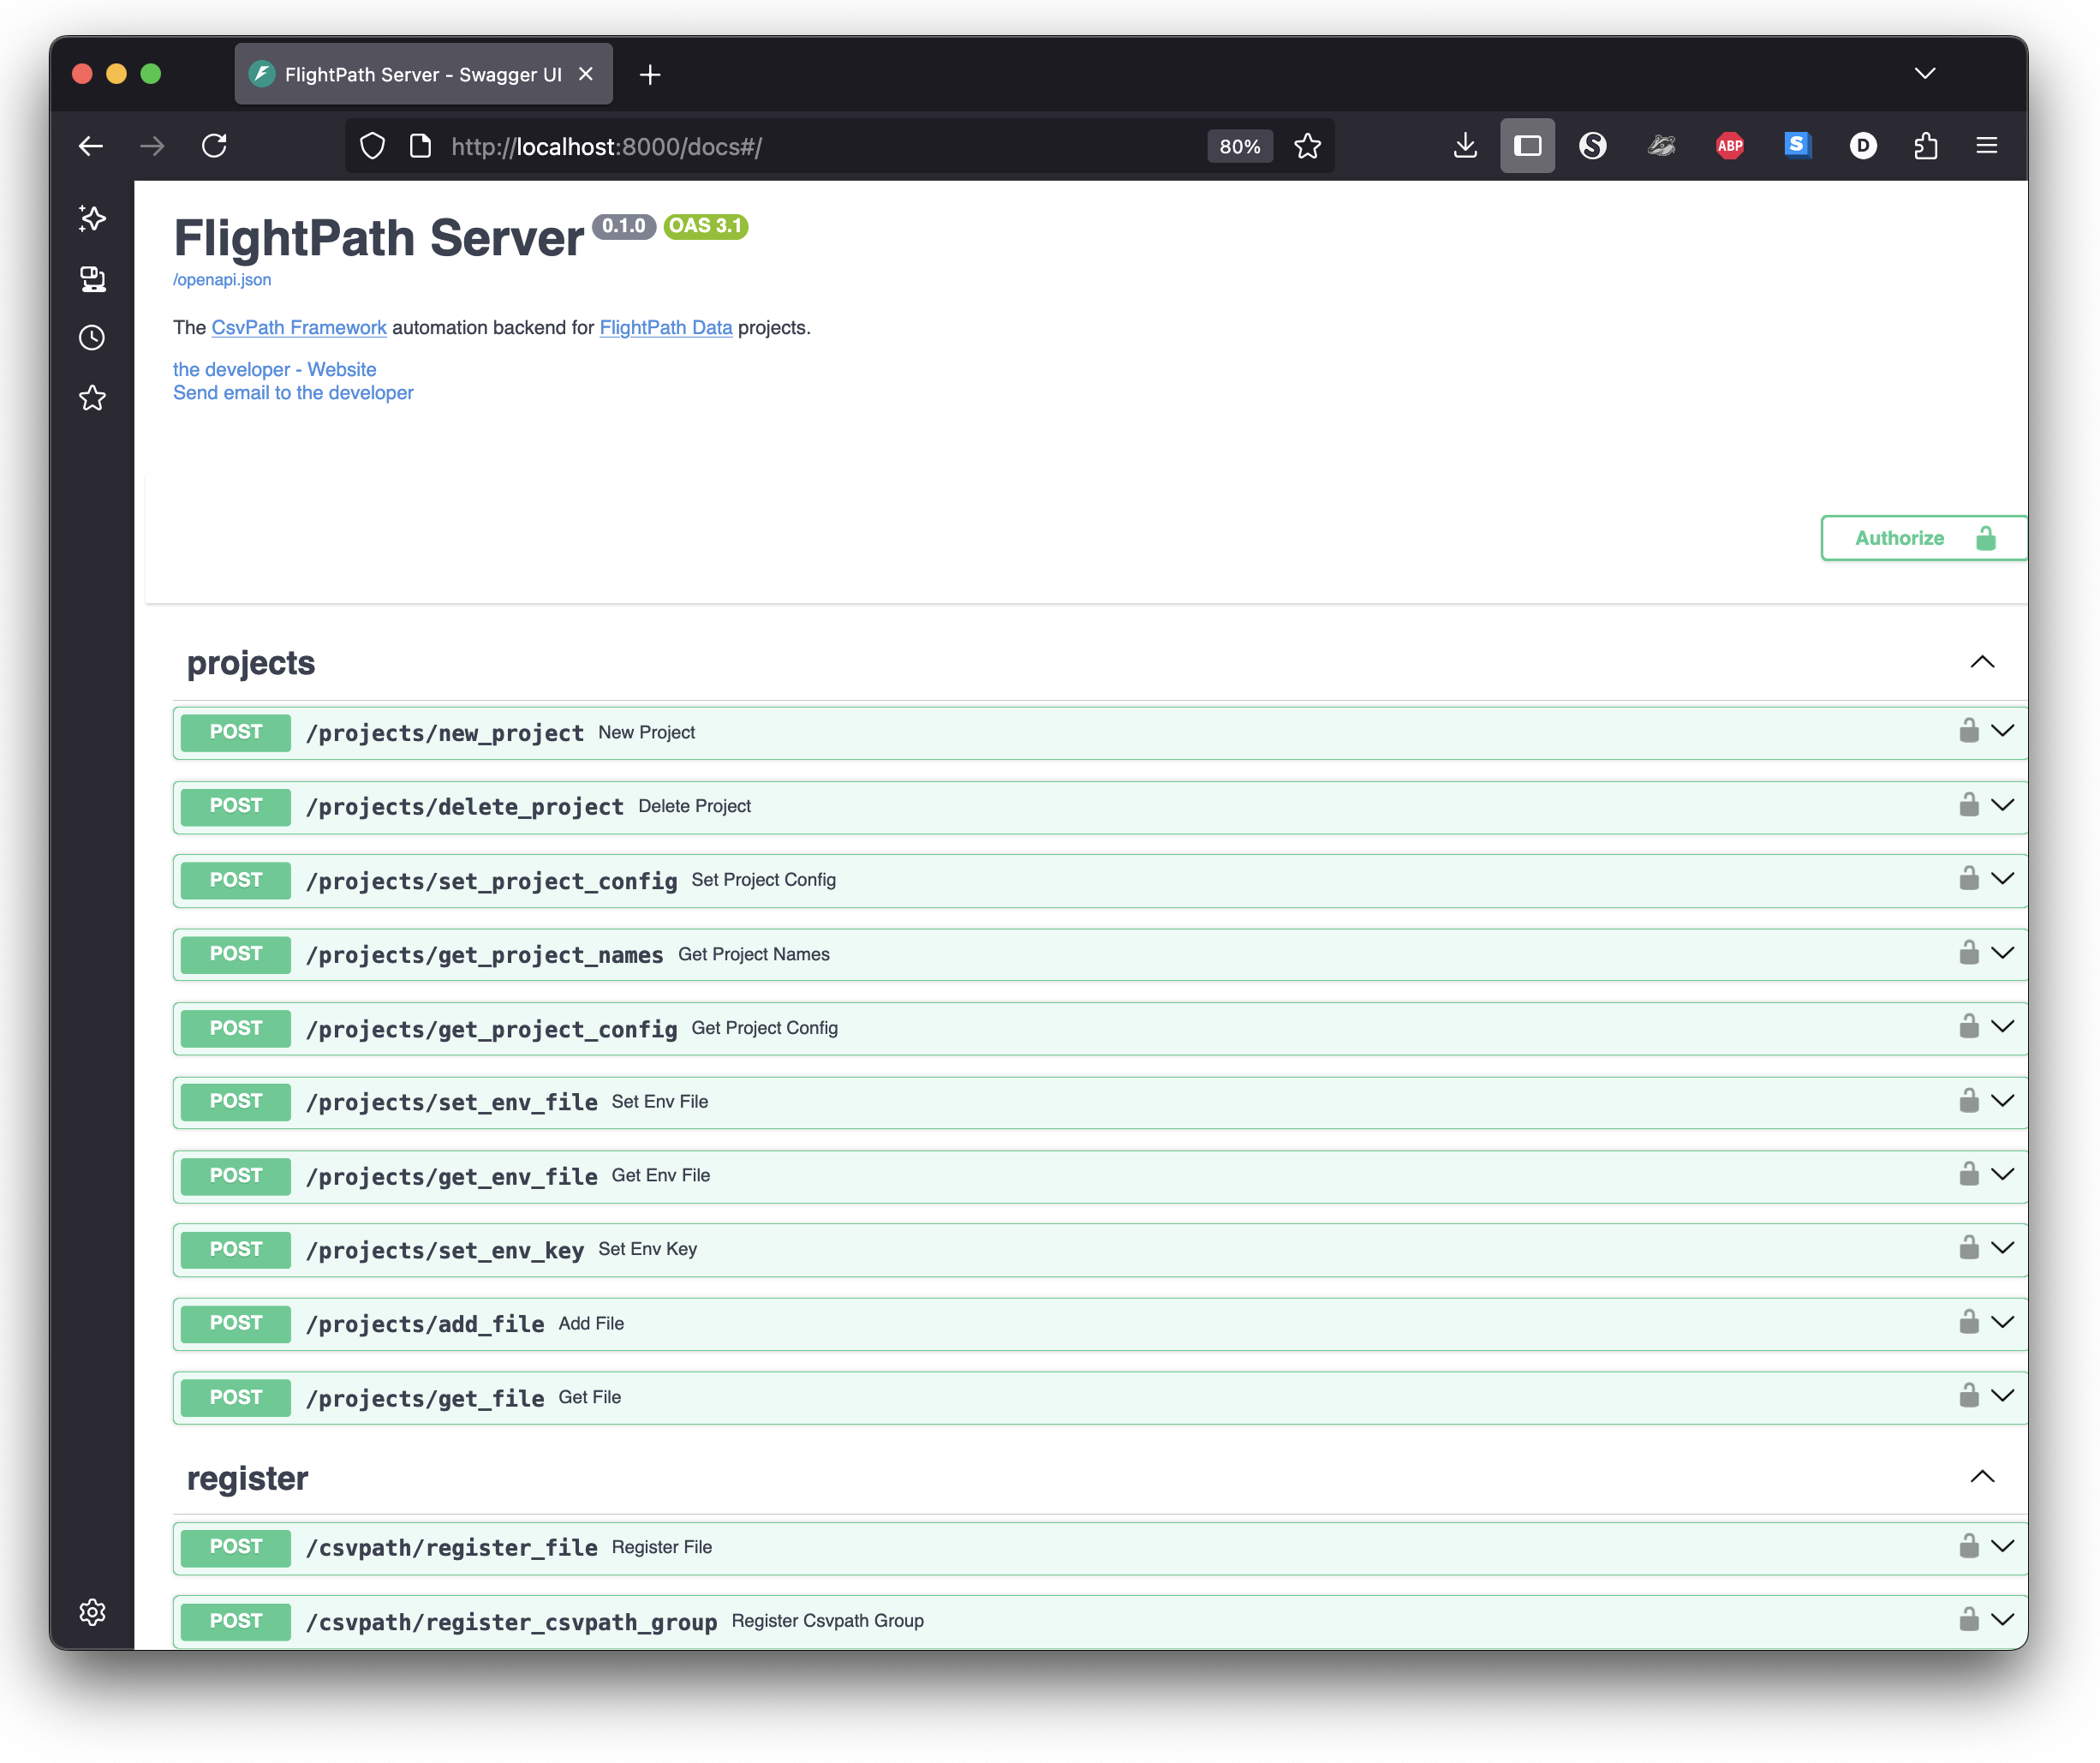
At this point your FlightPath Server should be live at the default address, http://localhost:8000/docs. Opening this address in your browser displays the OpenAPI documentation for the endpoints.
Windows
Windows requires a second binary for FlightPath Server, FlightPathServer.exe. The install directory is typically in C:\Program Files\WindowsApps\FlightPathData... You should be able to browse to the location. As with macOS, this is a sandboxed location so you must be an admin. As well as browsing, you can also find the location using PowerShell like this:
(Get-AppxPackage -Name "FlightPathData").InstallLocation
When you launch FlightPathServer.exe you do not need to pass any flags. The binary only offers the server. You will see the app as FlightPathData.exe in the same folder.
3 - Create your admin key
When FlightPath Server launches it has no users. Your first request should be to /admin/new_key creates the admin key. The admin key has a small number of privileged activities:
- Seeing all active runs
- Shutting down the server
- Making more admin keys
Note that API keys are project-based, not personal. All users collaborating on a project will use the same key.
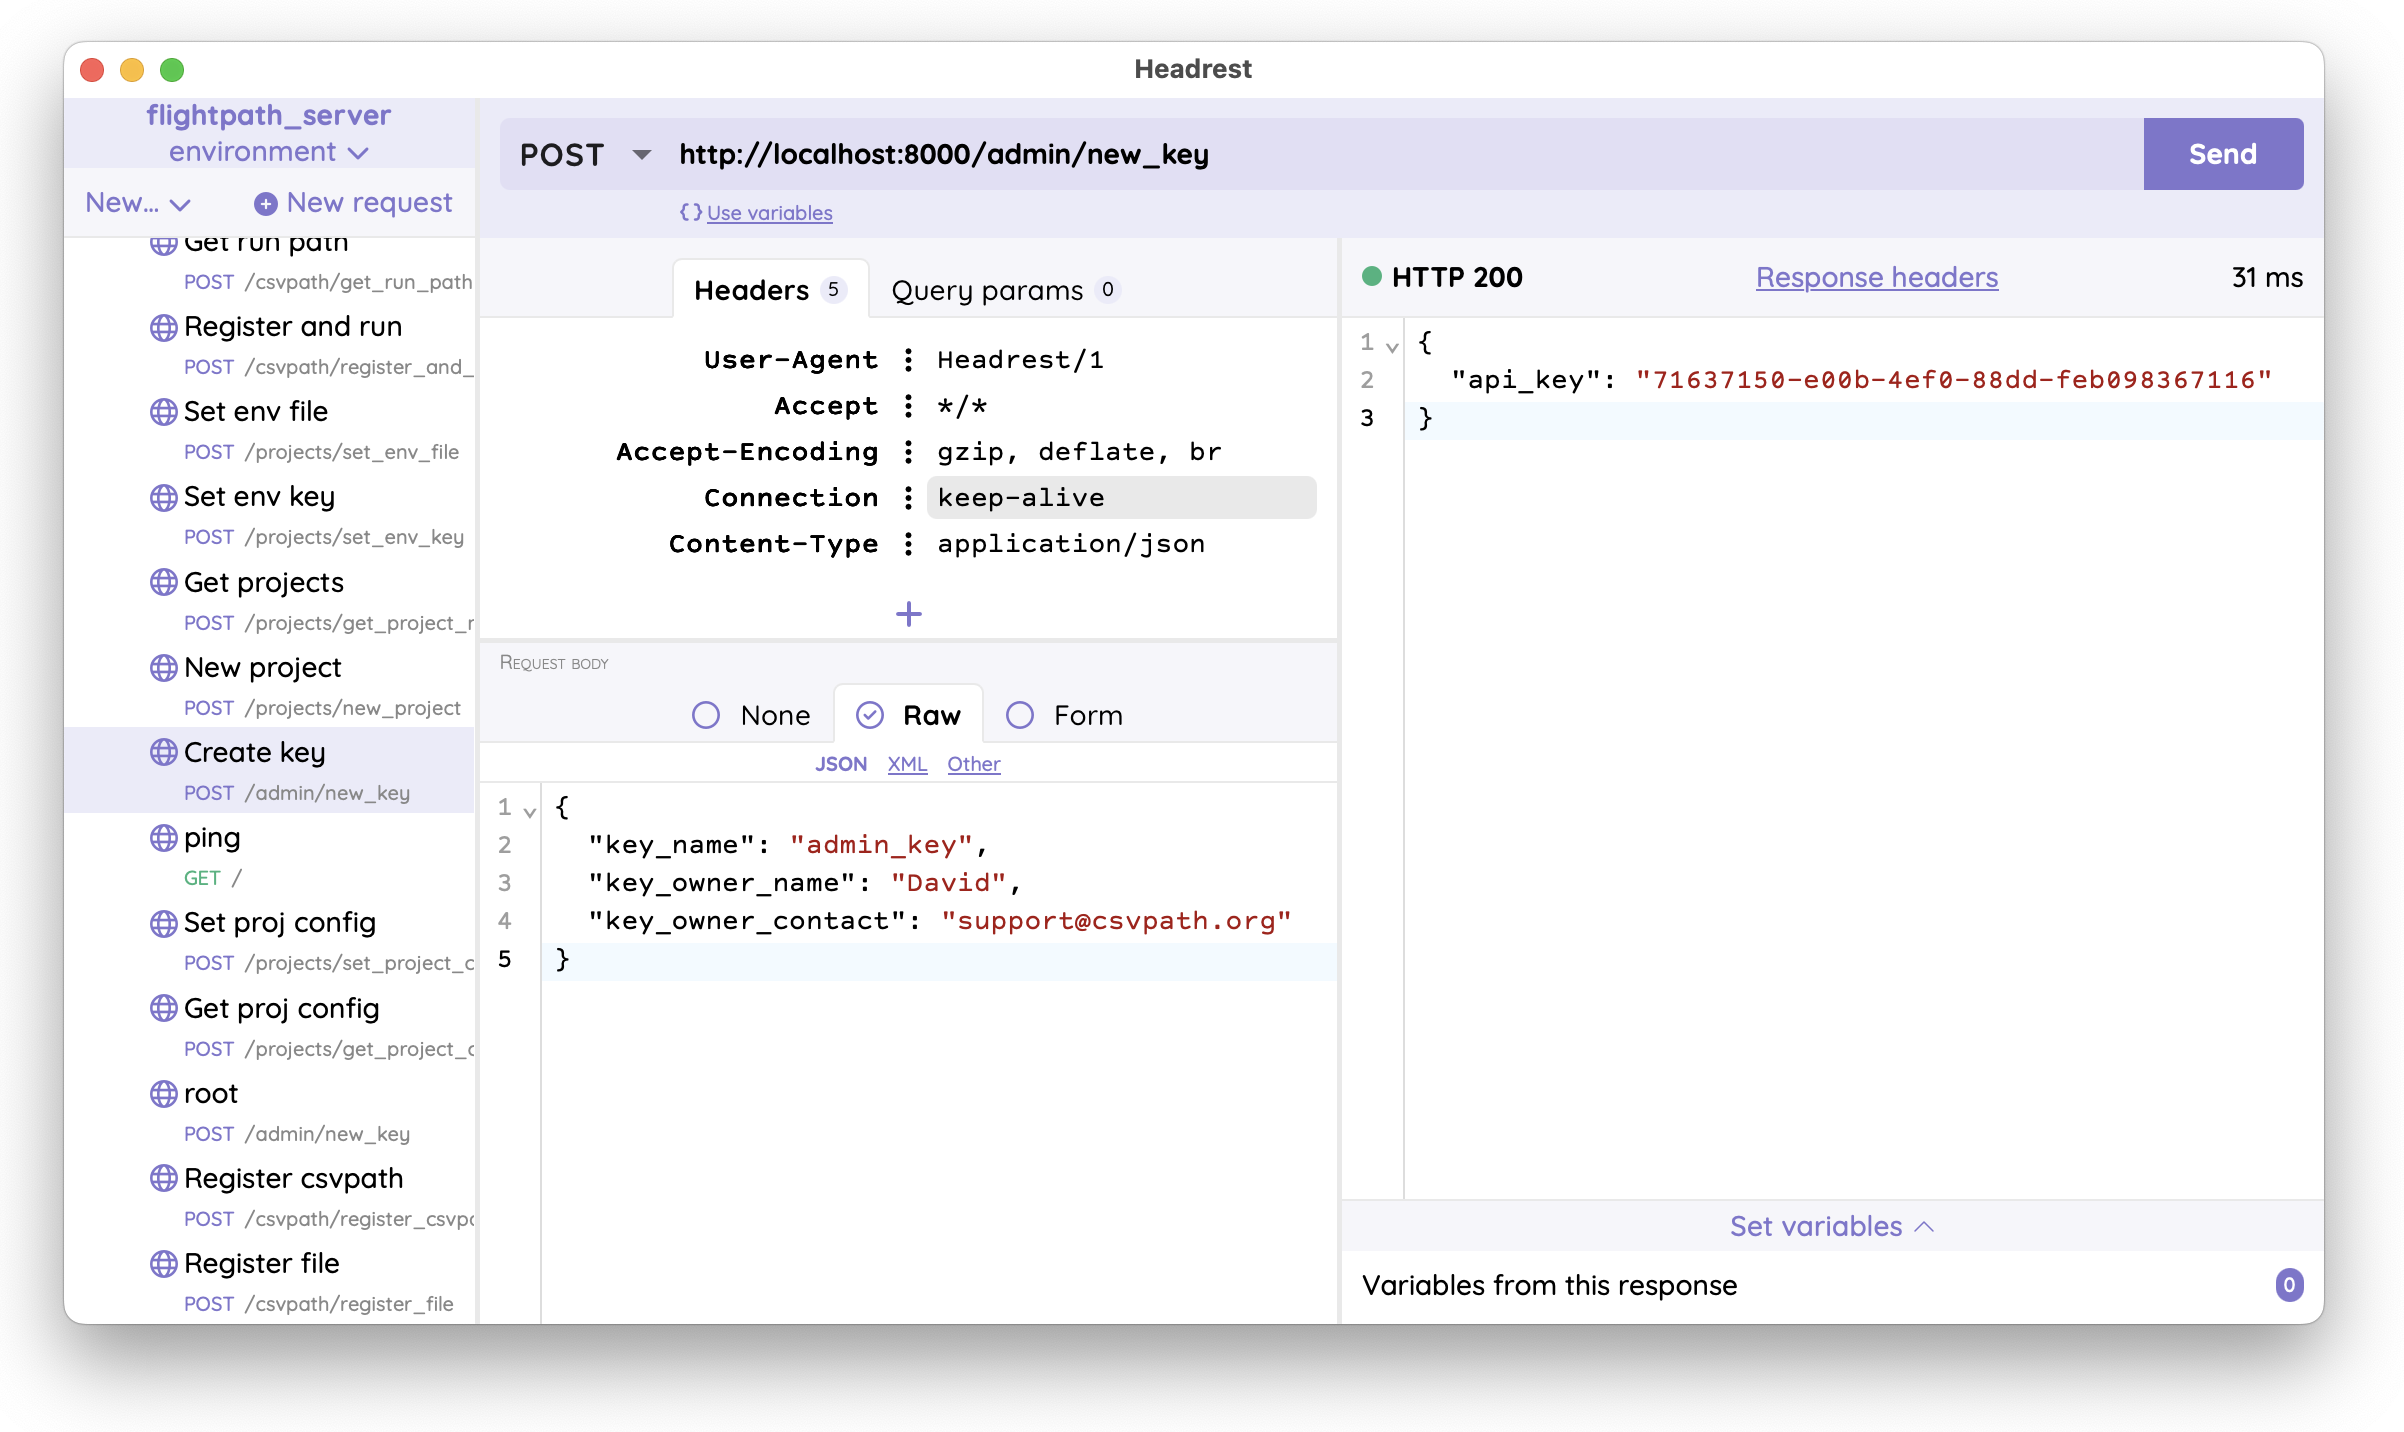
Option one: use your API dev tool
You can make the new_key request in your favorite API dev tool. The endpoint simply takes a JSON dict body with key name, key owner name, and key owner contact fields. No headers needed. Your request should look something like this screenshot.
Option two: make the key in FlightPath Data
Alternatively, and even even easier, you can create your admin key in FlightPath Data.
- Open FlightPath Data
- At the bottom left click the
Open configbutton - In the config panel’s vertical tabs, on the left, select
server - In the
Host with portbox enterhttp://localhost:8000, the default address - Click the
Create new keybutton - Enter the key name, key owner’s name, and key owner’s contact and hit
Create key - Copy the API key that FlightPath presents you once and only once
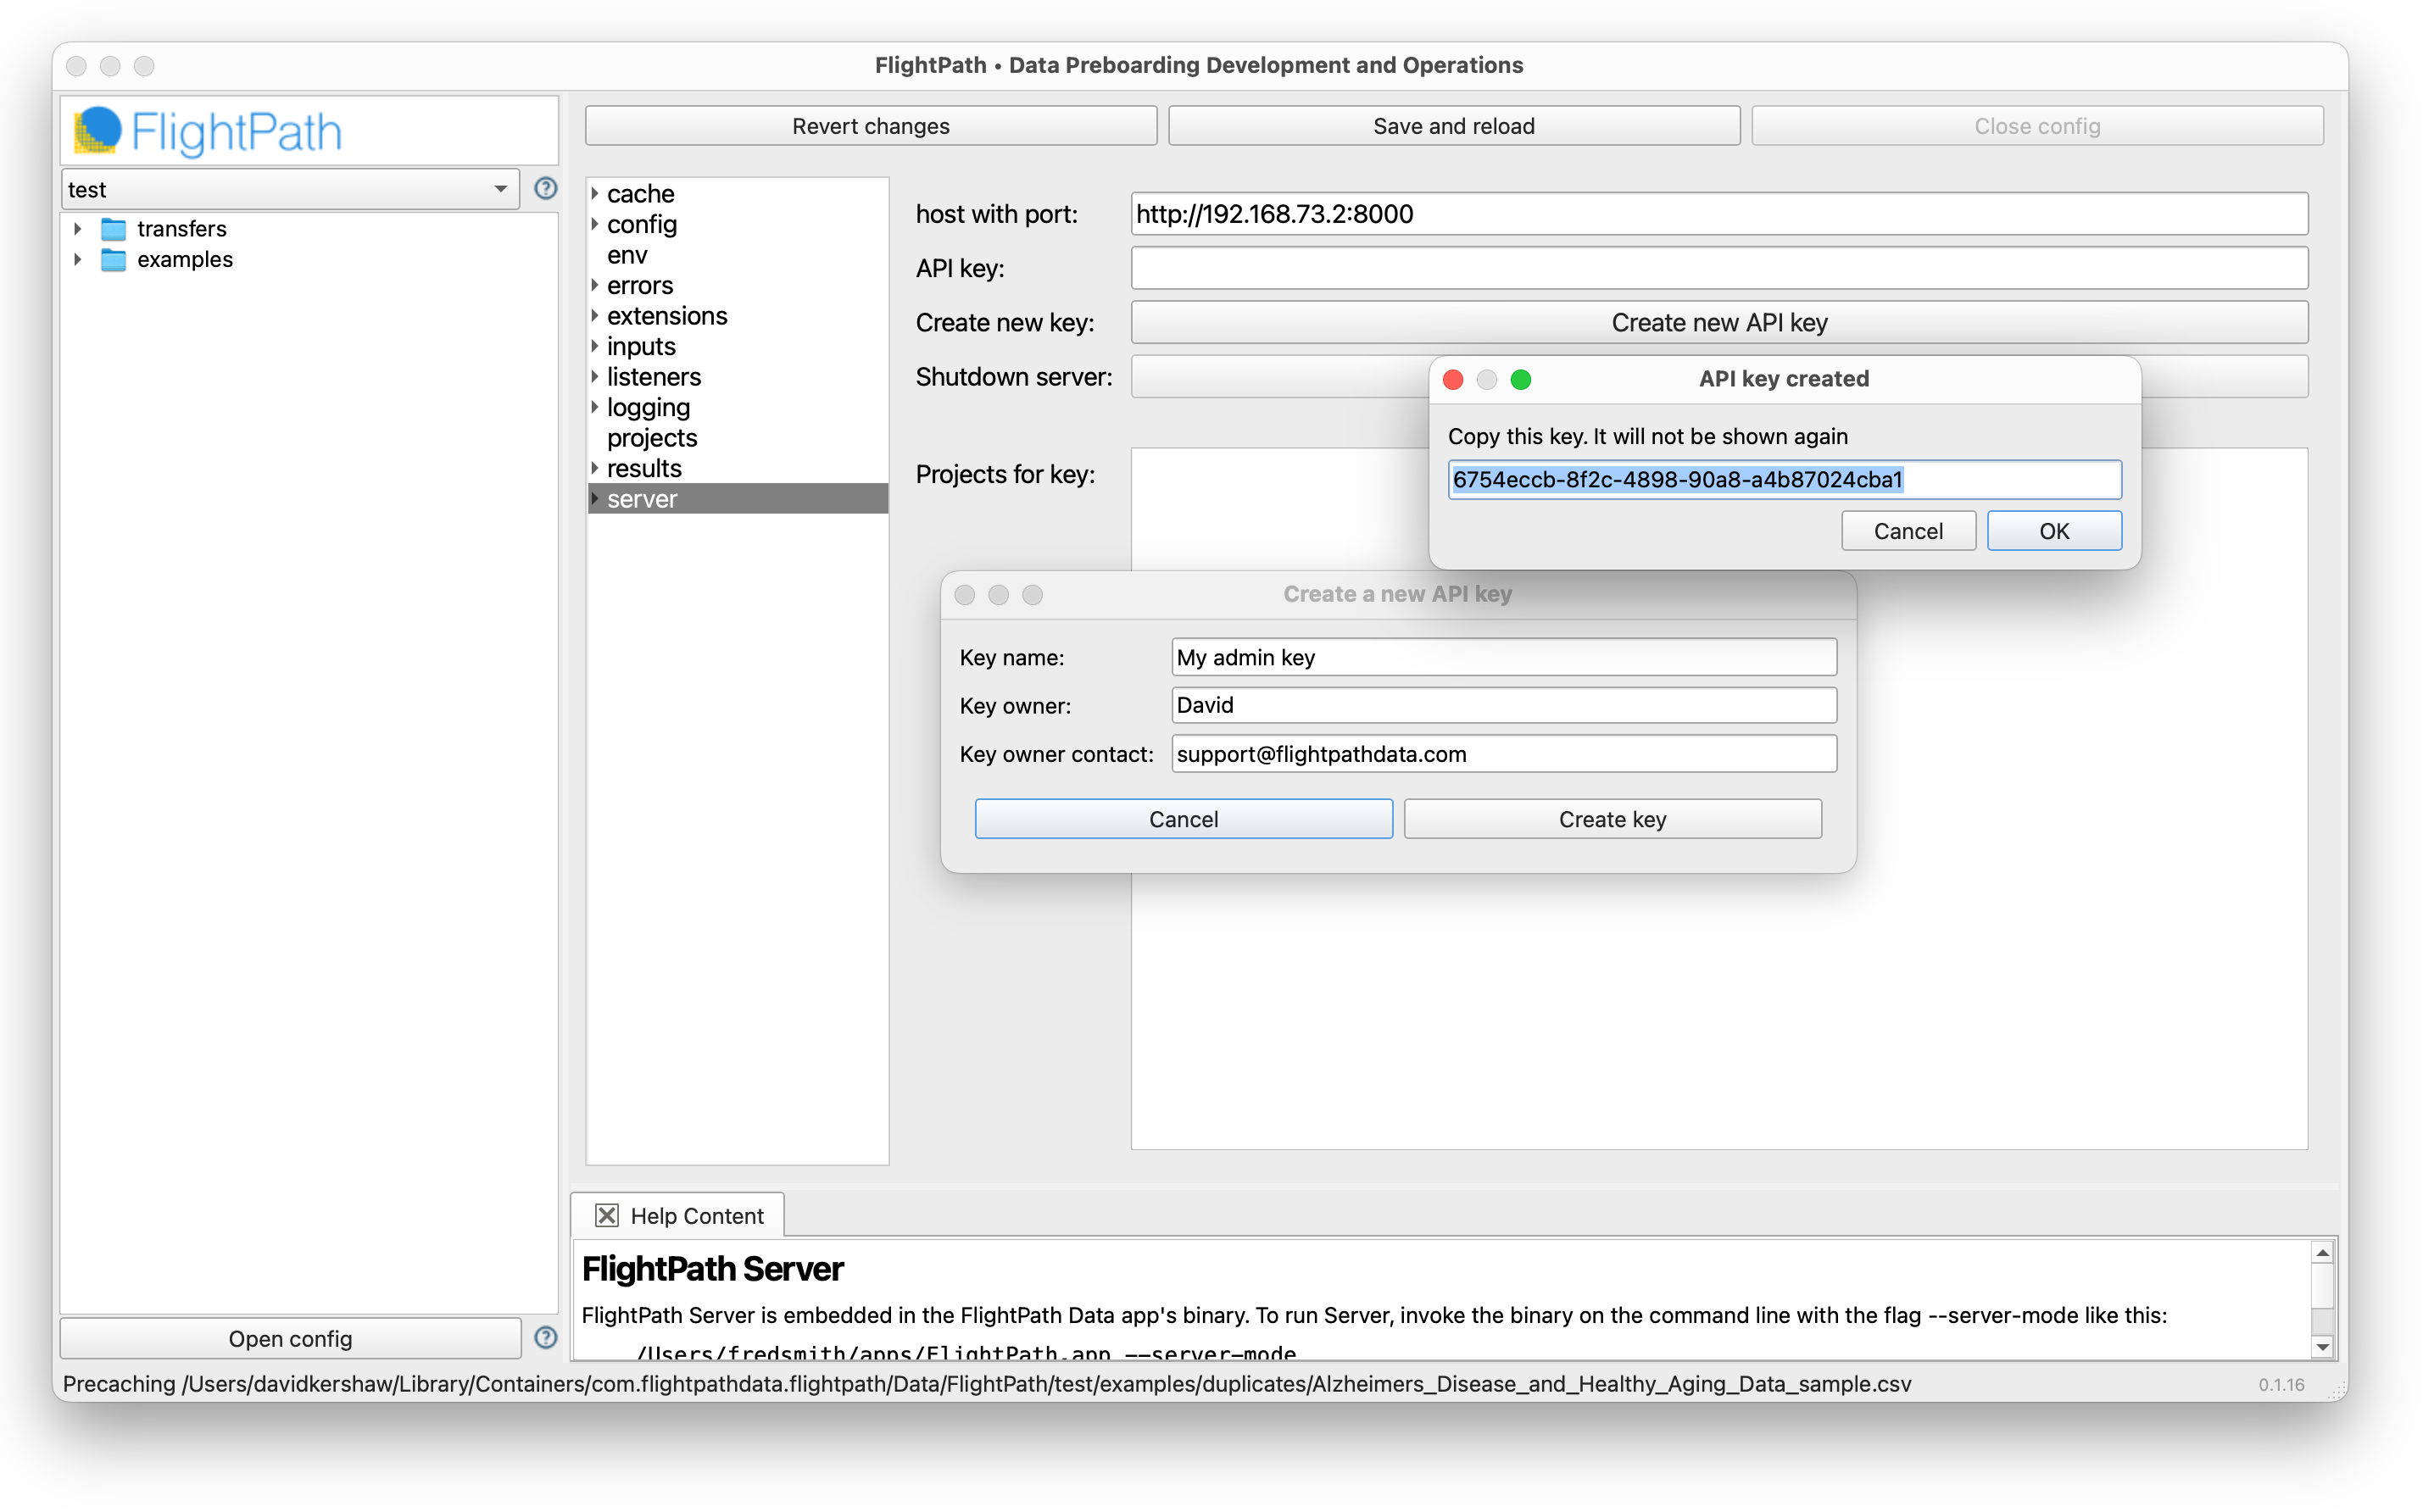
If you don’t capture the key, you may lose it irrecoverably. By default, FlightPath Server creates a hash key to API key map file in the config directory. The map makes it easier to identify projects given URLs or project owners from looking at a project directory. The trade-off is that API keys become less private.
To turn this behavior off set [security] key_index = no. If you turn this setting off, you won’t be able to recover keys. However, you can make a new one key and shift any projects on the original key to the new one, if needed. That recovery would require editing a JSON file, but it is not hard or especially risky.
4 - Check server access from FlightPath Data
Next, make sure you can deploy and manage projects in FlightPath Server from FlightPath Data.
- Open FlightPath Data
- At the bottom left click the
Open configbutton - In the config panel’s vertical tabs, on the left, select
server - In the
Host with portbox enterhttp://localhost:8000 - In the
API keybox enter the key you just made - Click the
Save and reloadbutton at the top center
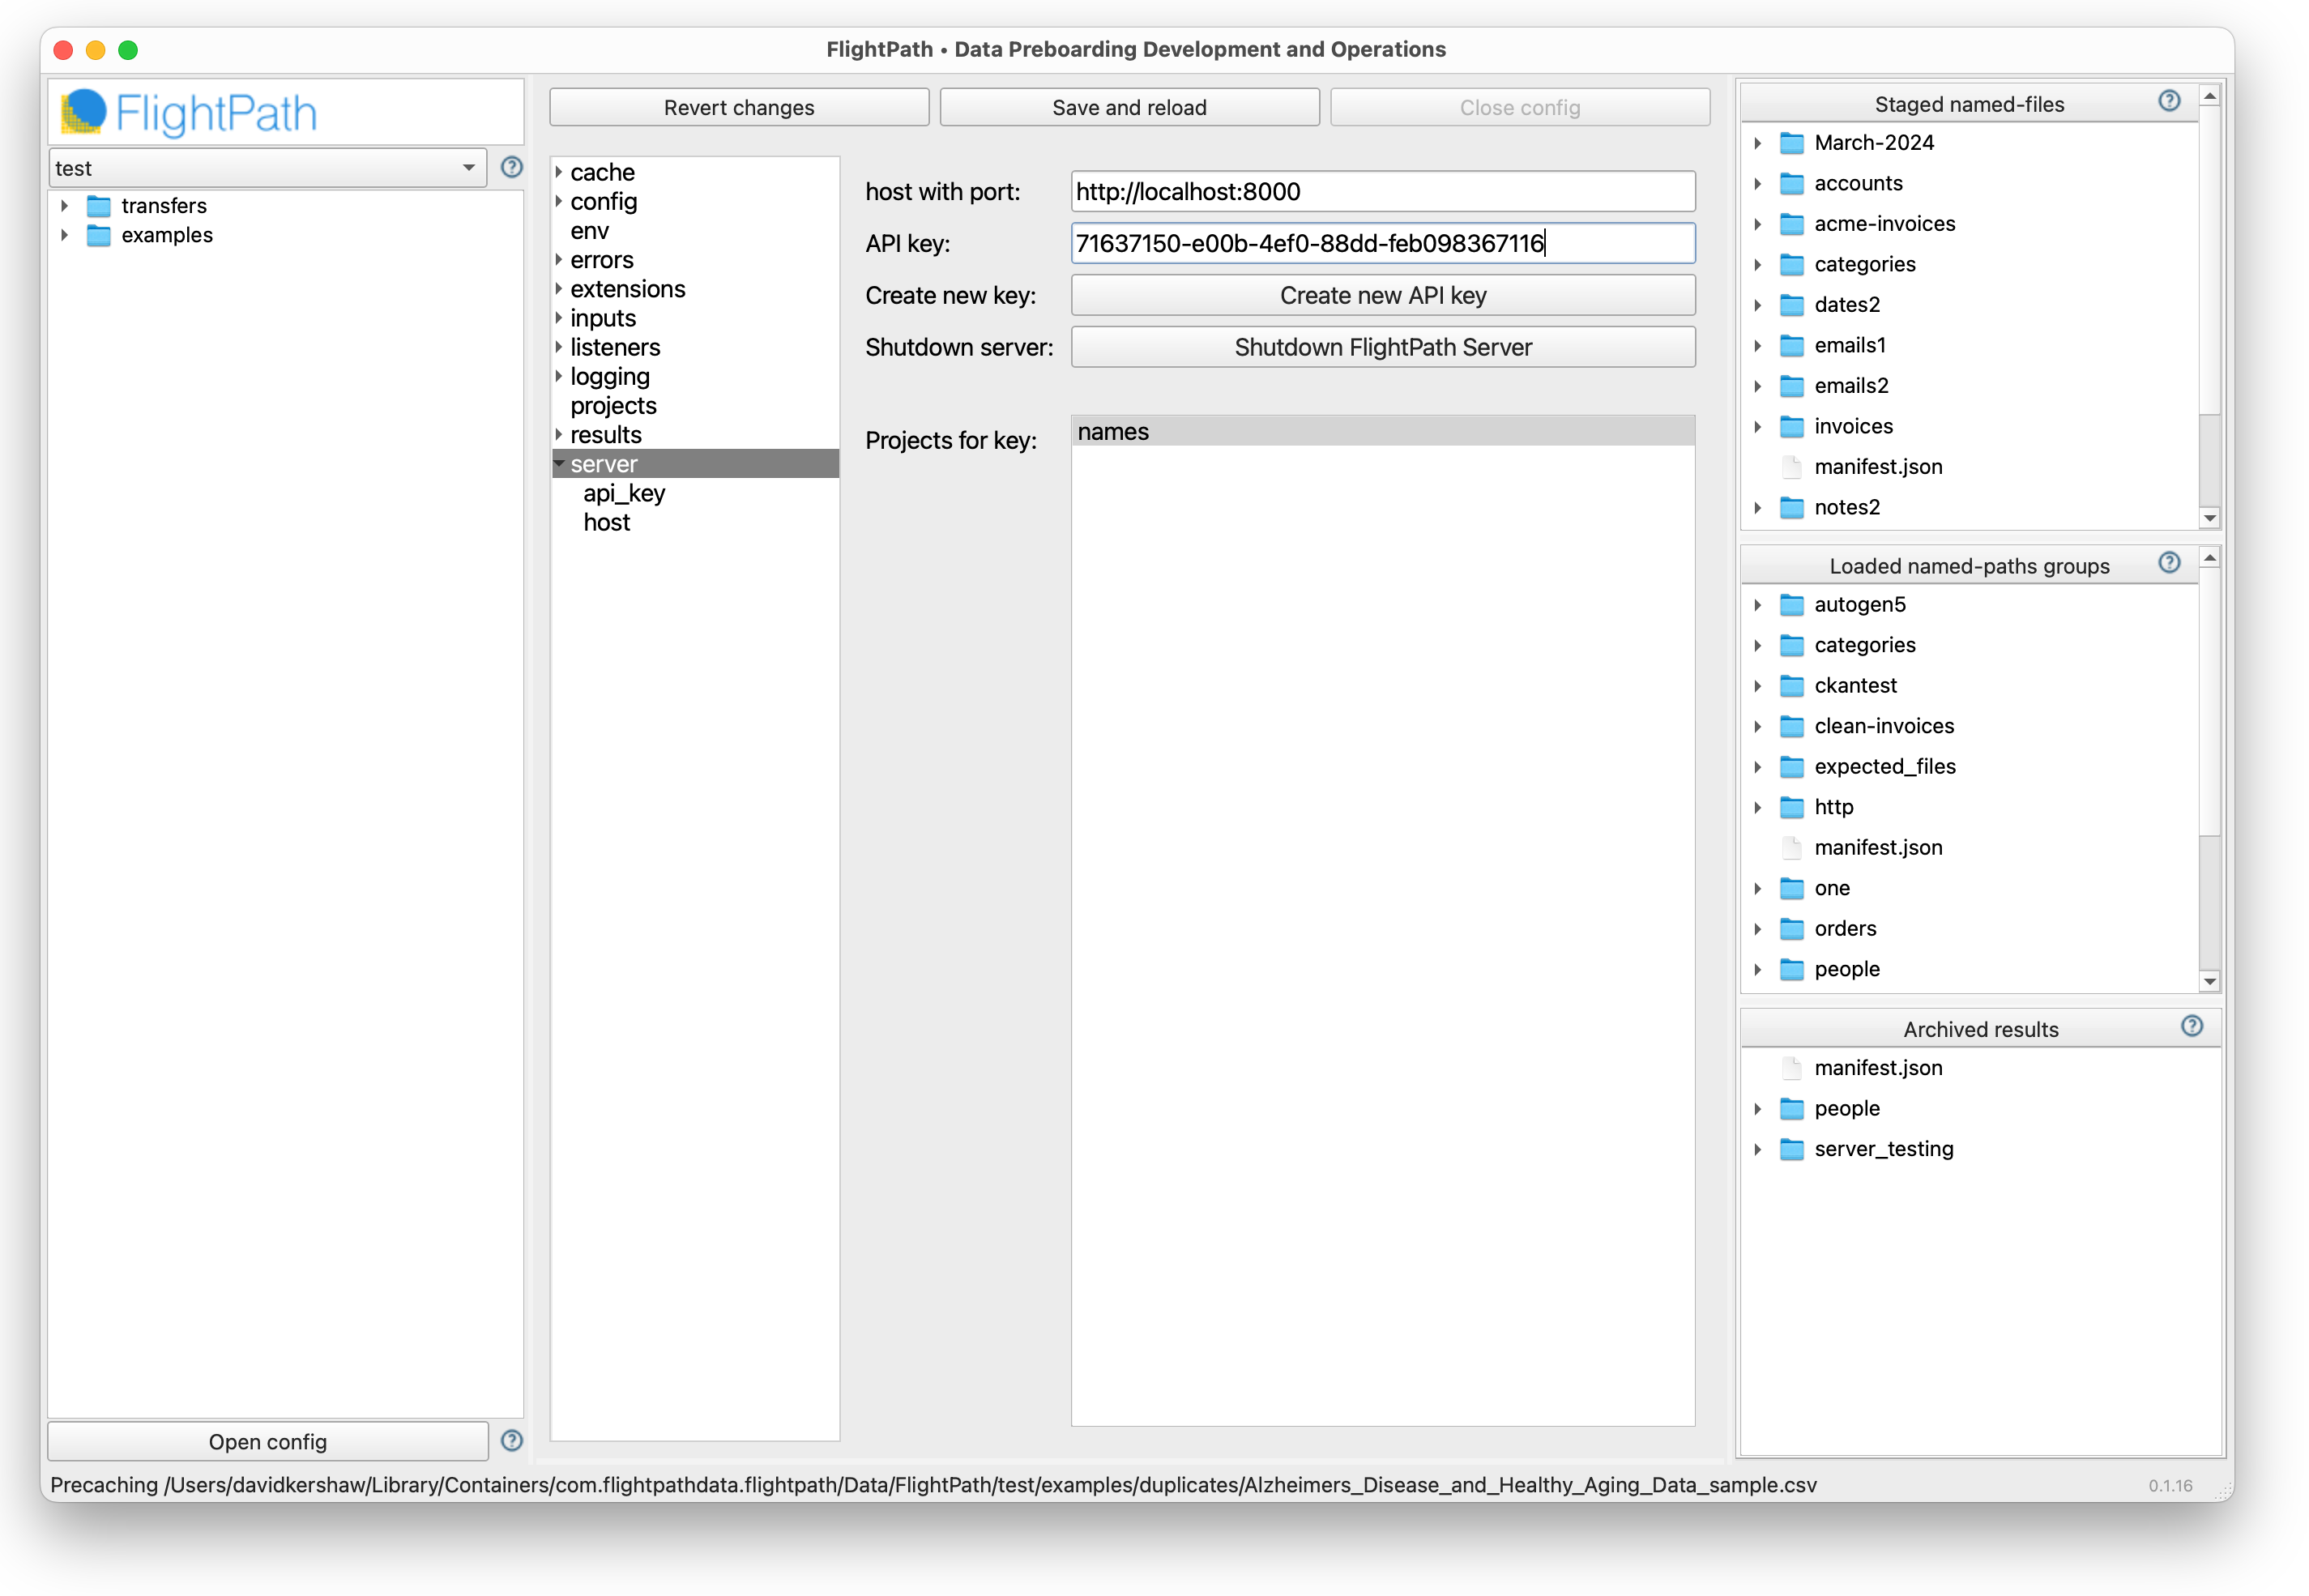
You should now see the Shutdown FlightPath Server button become enabled. You now have the ability to deploy projects to FlightPath Server. The actions you can take are available on the context menu when you right-click in the box labeled Projects for key.
You are ready for automated data preboarding
Your next steps are:
- Create a FlightPath Server project based on a local FlightPath Data project
- Deploy CsvPath Language validations to the server
- Try staging data and running
- Hook up your managed file transfer server to call FlightPath Server when new data is available